Welcome to publishing and selling your paperback book on the Createspace platform. Below is everything you need to know to sell your book on Amazon. This step by step demonstration written below will cover everything from downloading the required .word doc template, to actually listing your book for sale on the Amazon platform. So let’s get started… To watch a step-by-step video
To watch a step-by-step video Click Here.
Step 1. Book Cover Template.
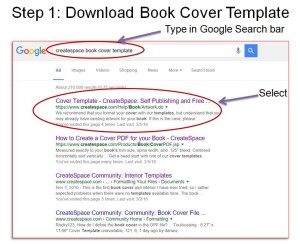
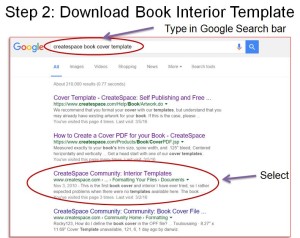
The first step is to go to the Google search bar and type in the phrase ‘Createspace book cover template. Click on the first result. You will be taken to a web page within Createspace.
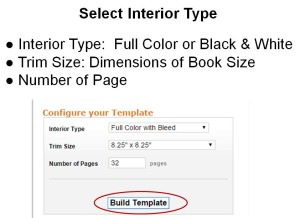
The box displayed has a drop-down option. What Createspace needs to know is the number of pages (interior) and the actual finished dimensions of your book so it can provide you with the correct size book template.
Now from the drop-down option select first what the interior of your book is going to be.
Is your book going to be in full color or black and white? Do you need to allow for the bleed if you are creating a picture book?
From the second drop-down option, you need to select the dimension size your finished book is going to be. The actual dimensions of my picture book are eight and a quarter inches by eight and a quarter inches.
Next, from the drop-down selection, Createspace needs to know the number of pages your finished book will have, including dedication page, copyright page, etc. Then click on the button ‘build template.’
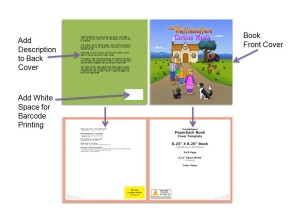
Example Book Cover: On the design of the book cover, I selected a thirty-two-page picture book. As you can view in my video, there is no room for a spine. (All a personal preference).
I have a front cover for my book. I have a back cover with a description, and I made sure I felt the recommended amount of white space so Createspace can print the ISBN.
Step 2. Book Interior Template.
Go back to the Google search bar and type in once again, ‘Createspace book cover template.’ This time, select the third option. ‘Createspace community interior template.’
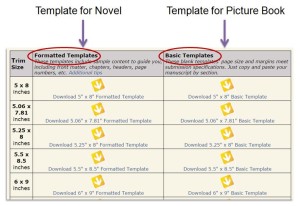
That will bring you to a page that looks like this one below.
On the left, you have the different size templates for Novels and on the right, you have templates for ‘Picture Books.’ On the far left once again make sure you select the correct trim size for your book. Then click the download option you need.
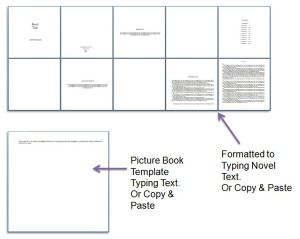
As you can view in the video, the template for a novel is already formatted for you. All you need to do is type in your text where it is already formatted.
The lower left templates are for picture books. Replace the text already there and start adding your own images and text.
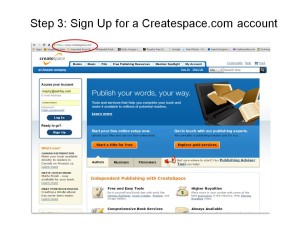
Step 3. Set-up a Createspace account.
Go to: http://createspace.com
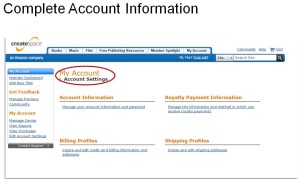
Sign up for an account. Fill in the necessary account information under My Account – Account Settings.
Complete as much information as possible, Royalty Payment Information, Billing Profile and Shipping Profile. All these steps are shown in the video. (Watch a Video).
Step 4. Add your Book Title.
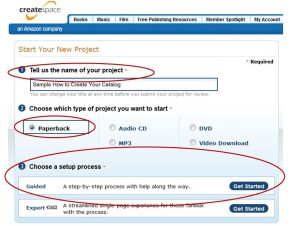
When your primary account information has been set-up, select ‘Add New Title’ from inside your dashboard.
Fill in your project name. Choose the paperback option. And step number 3 I highly recommend. CreateSpace offers a guided step-by-step process which will help you with every step that needs to be completed before launching your book to Amazon. I highly recommend the first time you use the Createspace platform you follow the guided tour.
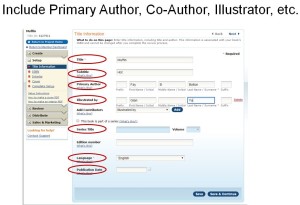
Complete all Title Information including the name of Author. Illustrator can be selected from the ‘Add’ button under ‘Add Contributors.’ Fill in the rest of the page and make sure you click, Save and Continue.
Step 5. ISBN
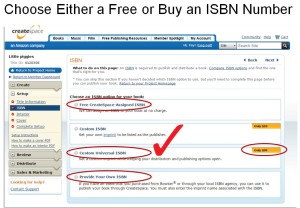
An ISBN number is how your book is identified. Every single book published has an ISBN number which is a unique identifier for books.
Createspace offers four options to acquire an ISBN number. They offer a free ISBN, but I highly recommend buying your own ISBN.
Note: Compare the options carefully because once you make your choice, it cannot be changed. Choose and click Continue. Access a narrated video.
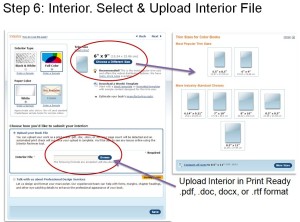
Step 6. Select and Upload Interior Files.
Createspace needs to know how you want your book to appear as a finished product.
Select from the Interior type. Is it going to be printed in black and white for a novel, or in full color for a picture book?
A black and white novel has the option of being printed on cream colored paper. A picture book does not have that option. It will be printed on white paper.
Next, select the trim size. The default setting is 6” x 9”. Make sure you click on ‘Choose a different size’ if this is not the actual interior size of your book.
Once you’ve selected the interior size, you need to upload the interior of your book.
We already downloaded the template you are going to write your manuscript on. Now we need to upload that template with its content for publishing. Upload your work as a print-ready .pdf, .doc, .docx, or .rtf file. I find leaving it as a word.doc uploads without any errors. If you receive an error, convert your file to a .pdf and upload it again. Click the ‘Save’ button.
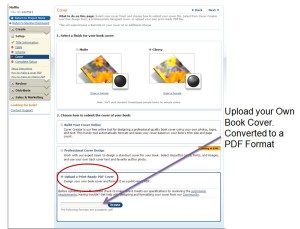
Step 7. Upload a .PDF Book Cover.
Select a finish for your book cover. You can choose either a matte finish or glossy.
Next, choose how to submit your book cover. There are three methods:
Build Your Cover Online. Createspace provides a free Cover Creator. These are pre-design book covers in a variety of colors and styles you can select from. You replace the already displayed text with your own content.
The second option Createspace offers is a professional cover designer service. This service starts at a cost of $399.
The third and final option Createspace offers is to upload a print-ready pdf cover. (Watch the ‘How to Publish and Sell a Paperback Book on Createspace Video).
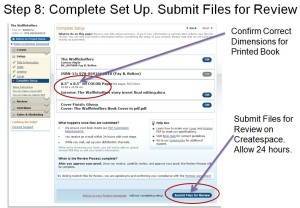
Step 8. Complete Set-Up. Submit Files For Review.
Confirm all information is correct before submitting your book for review. Make sure the title and subtitle are correct. Confirm it is the correct ISBN. Make sure that the book size is right. And finally, ensure that the right book cover finish has been selected. If everything looks correct, click the ‘Submit files for review’ button at the bottom of the page. You can go back and make changes by clicking the ‘Edit’ button if you need to make changes. When everything is correct, submit your book for review.
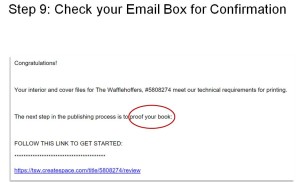
Step 9. Check your Email box for Confirmation.
Once you have submitted your book for review, please allow about 24 hours for Createspace to review your files.
Once your file has been reviewed, they will send you an email letting you know that the next step is to proof your book.
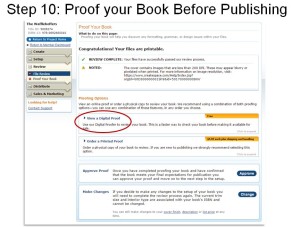
Step 10. Proof Your Book Before Publishing.
Under proof your book, you have two options.
One. View a digital proof which I highly recommend and it is a free option. When you select this option, you can preview your book in a .pdf format. At this point, you can take note of the layout of your book. How it will look as a finished product. If text or images are not aligned you can make adjustments on your word.doc template, then upload your file once again. Each time files are uploaded for review, please allow 24 hours for Createspace to notify you that your files are available for proofing.
I recommend proofing your entire book and making all changes at the same time. Then upload files once again for the review.
Once your book layout is to your satisfaction, go ahead and order an actual physical proof of your book to be mailed to you.
My picture book has sixty pages, so it cost me five dollars and five cents for Createspace to print out a copy of my book. Plus $3.99 for shipping. Each print book cost will vary depending on the number of pages and whether it is printed in full color or in black and white. My coloring book which is printed in black and white, cost $2.05 to print and contains 32 pages.
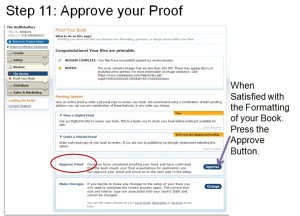
Step 11. Approve Your Proof.
Receiving a physical proof of your book in the mail can vary depending on where you live. I recommend allowing 7 – 10 days to receiving your book in the mail if sent regular mail. You can also request expedited shipping and pay extra for postage. While waiting for your proof to arrive in the mail, I suggest working on marketing your book or write another manuscript.
When your book comes in the mail, and everything looks perfect, go back to the proof your book page and click on the approve button.
Now you have a physical product; the next step is to add content on the Amazon page where you will make your book sales.
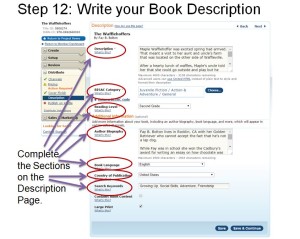
Step 12. Write Your Book Description.
Let’s get your page ready on Amazon so people can not only find your page but buy your book. You need to fill in as much information as you possibly can on this book description page.
The book description section can be the same description as to what you have written on the back cover of your book.
Fill in the BISAC information. BISAC (Book Industry Standards and Communications) codes are a “standard used by many companies throughout the supply chain to categorize books based on topical content.”
Click on the ‘Choose’ button to view further options in selecting a category.
Next, choose a reading level for your book.
I recommend filling in the autobiography section. Also, make sure you have filled in your author’s profile at https://authorcentral.amazon.com
Next, select the language for your book.
Next the Country of publication. Createspace books are published in the United States.
Then finally, in this section, you are allowed to select five keywords to help optimize your book page within Amazon.
If your book contains adult content or is large print, make sure you select a check mark next to either of those options.
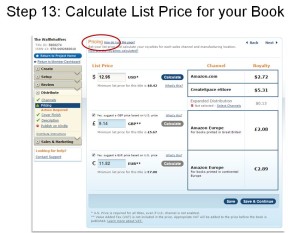
Step 13. Calculate List Price For Your Book.
My picture book has sixty pages, so Createspace advises me not to sell my book for any less than $8.42. If I select the list price of $12.95, my royalty per book will be $2.62 if my book sold from Amazon.com. If it sold from Createspace estore, my royalty would be $5.31. Your royalty payment will change depending on what platform your book sale came from.
When you have selected a list price, make sure you press the save and continue button.
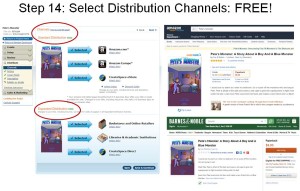
Step 14. Select The Distribution Channels.
The distribution channel offered by Createspace is offered free of charge. To get the most exposure for your book on the various platforms, we recommend distributing your book through all eligible sales channels such as Amazon and even Barnes & Nobel online store among others. Watch video to view channels available.
Conclusion: Take your time, follow the directions carefully on each page of the Createspace site and if you have any problems you can contact Createspace.com support. I’ve found them to be very helpful and courteous.
You can also watch a 25 minute video that I recorded on ‘How to Publish and Sell a Paperback Book on Createspace.’ This is a step-by-step video that walks you through every step you need to complete to publish your book on Createspace.
If you have any questions, please contact us.
